What Is A Storyboard And Its Key Role In Visual Project Planning
Table of Contents
- Definition and Core Purpose of Storyboards
- Storyboards as a Bridge Between Ideas and Execution
- Traditional Hand-Drawn Storyboards vs. Digital Storyboard Tools
- Comparison of Digital Storyboard Software
- Industry-Specific Applications of Storyboards
- Structure and Components of Storyboards
- Standard Elements of a Storyboard Panel
- Organizing a Storyboard Sequence for a 30-Second Commercial
- Rule of Thirds in Storyboard Layout
- Critical Differences Between Storyboard Types
- Applications Across Industries
- Role of Storyboards in Game Development: Level Design and Character Interactions
- Storyboards in Architecture and Interior Design: Visualizing Spatial Layouts
- Comparative Analysis: Storyboards in Marketing Campaigns vs. Educational Content
- Creation Process and Techniques for Storyboarding
- Step-by-Step Guide to Creating a Storyboard for a Short Narrative Film
- Color Coding in Storyboards for Departmental Coordination
- Translating Script to Storyboard Without Losing Narrative Flow
- Tools and Software for Storyboard Creation
- Comparison of Free vs. Paid Storyboard Software
- Digital Tablet Workflow for Storyboard Artists
- AI-Assisted Storyboard Creation
- Visual Storytelling and Best Practices in Storyboarding
- Principles of Visual Storytelling in Storyboards
- Conveying Motion and Timing in Static Panels
- Maintaining Visual Consistency in Storyboards
- Template for a Storyboard Critique Sheet
- FAQ
- What does a storyboard artist do, and what skills do they need?
- How is a storyboard used in film production?
- What is the purpose of a storyboard when making a video?
- Can you show me an example of a storyboard?
- What is the role of a storyboard in the game Epic (or Fortnite )?
- How does a storyboard apply to instructional design?
A storyboard serves as the blueprint for visual storytelling, transforming abstract ideas into structured sequences that guide production across media, advertising, and film. By blending narrative flow with spatial composition, storyboards bridge creative vision and execution, ensuring clarity from concept to final output. Whether through traditional sketches or digital tools, their adaptability makes them indispensable in industries where precision and engagement define success.
From breaking down complex scenes into digestible panels to aligning teams on visual direction, storyboards function as a universal language. Their evolution—from hand-drawn roughs to AI-assisted digital workflows—reflects a dynamic toolkit that balances artistic expression with technical efficiency. Understanding their core principles unlocks the potential to streamline projects, enhance collaboration, and elevate storytelling impact.
Definition and Core Purpose of Storyboards
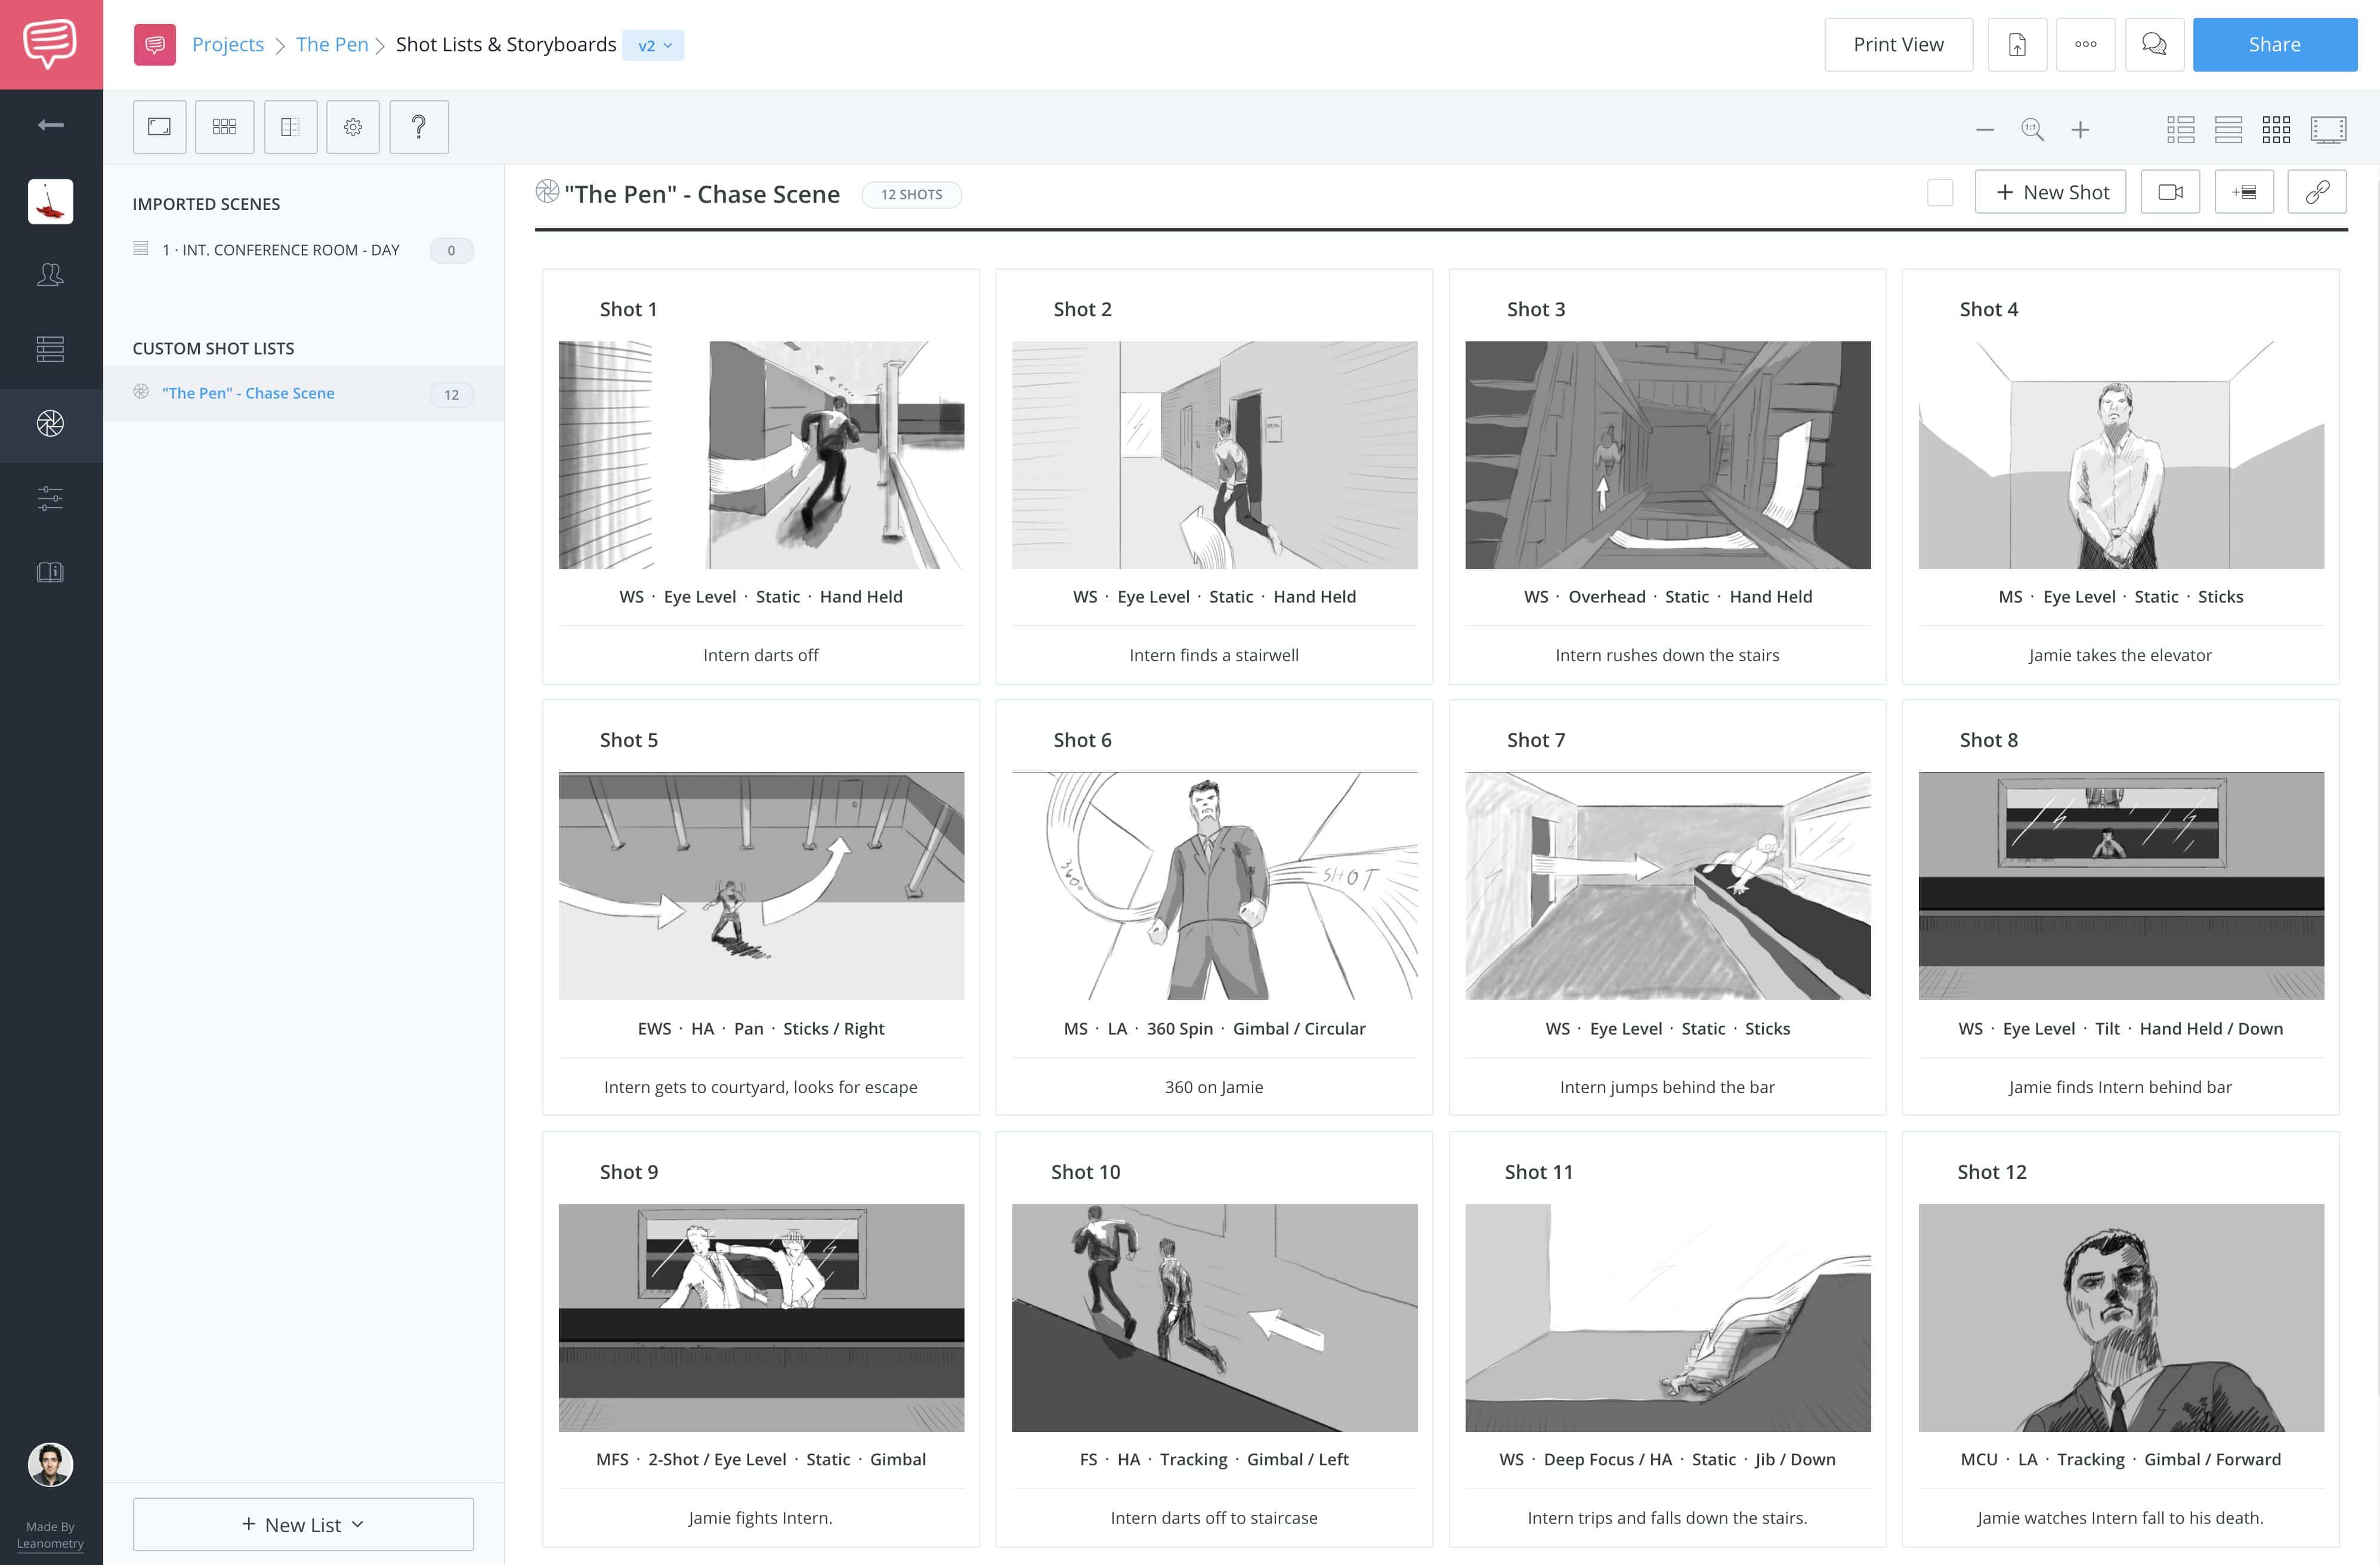
Storyboards serve as a foundational visual planning tool, enabling creators to map out sequences, interactions, and narrative flow before full-scale production. Their core purpose lies in translating abstract ideas into structured, communicable frameworks, ensuring alignment among stakeholders—from directors and writers to designers and engineers. By serving as a blueprint, storyboards mitigate risks of misinterpretation, reduce production costs, and streamline workflows across industries such as film, advertising, animation, and user experience (UX) design. Their versatility stems from their ability to integrate textual annotations, sketches, and visual references, making them indispensable in both creative and technical project development.The primary function of a storyboard is to bridge the conceptual and execution phases by providing a tangible representation of a project’s progression. This tool ensures that all parties involved—whether in media, marketing, or software development—share a unified vision of the end product. For instance, in film production, storyboards help directors visualize camera angles, transitions, and actor movements, while in advertising, they outline ad sequences to align messaging with design. The structured nature of storyboards also facilitates iterative feedback, allowing for refinements before resources are committed to final production.
Storyboards as a Bridge Between Ideas and Execution
Storyboards function as a transitional medium, converting abstract concepts into actionable steps through sequential visualization. This process enhances clarity by breaking down complex narratives or workflows into digestible segments, each represented by a single frame or panel. The effectiveness of this approach is rooted in its ability to:In media and advertising, storyboards are critical for pre-visualization. For example, a television commercial storyboard might include frames detailing shot compositions, text overlays, and pacing, ensuring the final ad aligns with brand guidelines and audience engagement metrics. Similarly, in film production, storyboards like those used in The Social Network (2010) or Inception (2010) were instrumental in planning intricate visual effects and narrative pacing. The tool’s adaptability extends to UX/UI design, where wireframes and interaction flows function analogously to storyboards, mapping user journeys and interface transitions.
Traditional Hand-Drawn Storyboards vs. Digital Storyboard Tools
The evolution of storyboard creation has transitioned from hand-drawn techniques to digital workflows, each offering distinct advantages in terms of accessibility, collaboration, and output quality.Hand-drawn storyboards rely on physical sketches, often executed on paper or whiteboards, using pencils, markers, or digital tablets for initial drafts. This method emphasizes tactile creativity and spontaneity, allowing artists to experiment with layouts and compositions freely. However, it presents challenges in revision, sharing, and scalability, as changes require re-drawing or scanning. Traditional storyboards are best suited for low-budget projects, brainstorming sessions, or environments with limited digital infrastructure.
Digital storyboard tools, conversely, leverage software to create, annotate, and share storyboards electronically. These platforms offer features such as template libraries, animation previews, and cloud-based collaboration, significantly accelerating workflows. Digital tools also enable integration with other production software (e.g., Adobe Creative Suite, Final Cut Pro), streamlining the transition from planning to execution. The trade-off lies in the initial learning curve and potential loss of organic sketching intuition, though many digital tools now incorporate hand-drawn-style brushes to mitigate this.
Comparison of Digital Storyboard Software
The following table contrasts three widely used digital storyboard tools, highlighting their platforms, key features, and ideal use cases. Selection criteria include ease of use, collaboration capabilities, and integration with industry-standard software.| Tool Name | Platform | Key Features | Best For |
|---|---|---|---|
| Storyboard That | Web-based (Chrome, Safari, Edge), iOS/Android apps |
|
Educators, marketers, and small teams requiring user-friendly, template-driven storyboard creation with minimal technical setup. |
| Boords | Web-based (cross-browser), iOS/Android apps |
|
Film directors, production designers, and animation studios needing precise technical planning and on-set collaboration. |
| CelAction | Windows/macOS (desktop), iOS app |
|
Animators, illustrators, and indie filmmakers prioritizing artistic control and hybrid workflows. |
Industry-Specific Applications of Storyboards
Storyboards adapt to diverse fields by tailoring their structure to discipline-specific requirements. Below are examples of how the tool is applied in film, advertising, UX design, and training simulations:-
Film and Animation:
Storyboards in this sector emphasize visual continuity and shot composition. For instance, directors like Christopher Nolan use storyboards to plan complex action sequences, such as those in The Dark Knight (2008), where each frame details camera movements, lighting, and actor positioning. Digital tools like Boords enable real-time adjustments based on actor availability or set constraints."A storyboard is like a comic strip for grown-ups. It’s a way to tell a story visually before anyone spends a dime on film." — Christopher Nolan (filmmaker)
-
Advertising and Marketing:
Advertising storyboards focus on brand messaging and audience engagement. Agencies use tools like Storyboard That to create sequences that align with campaign goals, such as demonstrating a product’s features or evoking emotional responses. For example, a storyboard for a car commercial might include frames showing the vehicle’s performance, safety features, and lifestyle appeal, ensuring the final ad adheres to creative briefs. -
User Experience (UX) Design:
In UX, storyboards morph into user journey maps or interaction flows, depicting how users navigate interfaces. Tools like Miro or Figma (with storyboard plugins) allow designers to sketch app screens, user actions, and potential pain points. For example, a storyboard for a mobile banking app might outline the steps from login to transaction completion, highlighting where users might abandon the process.
< - Hook (0–5 seconds): 1–2 panels to grab attention (e.g., a striking visual or bold headline).
- Product Introduction (5–10 seconds): 2–3 panels showcasing the product in action, with clear benefits highlighted.
- Problem/Solution (10–20 seconds): 2–4 panels illustrating a relatable issue followed by the product’s resolution (e.g., "Tired of slow coffee? Our machine brews in 10 seconds!").
- Call to Action (20–30 seconds): 1–2 panels with a strong closing image (e.g., logo + tagline) and transition to a website or store.
- Use cuts for abrupt shifts (e.g., from a problem to a solution).
- Employ wipes or dissolves for smoother transitions (e.g., fading from a before/after comparison).
- Motion lines in frames can imply movement between panels (e.g., a character’s path from one scene to the next).
- Focal Points: Placing subjects (e.g., a product, character, or text) at grid intersections ensures they stand out without dominating the frame. For instance, a commercial for a smartphone might position the device at the top-right intersection while the user’s hand aligns with the bottom-left line.
- Movement and Flow: Diagonal lines along the grid imply motion, guiding the viewer’s gaze through the sequence. In a storyboard for a chase scene, characters could be arranged along the grid’s diagonals to suggest forward momentum.
- Negative Space: Leaving one-third of the frame empty prevents clutter, especially in UI storyboards where whitespace improves usability. For example, a login screen might place the password field at the lower-right intersection, leaving the top-left area for branding.
- Live-Action: Use the rule of thirds for camera angles (e.g., placing a speaker’s head slightly off-center to create tension).
- Animation: Exaggerate grid lines in sketches to emphasize dynamic poses or expressions (e.g., a character’s eyes at the top-third intersection for emphasis).
- UI Design: Align interactive elements (buttons, icons) along grid lines to optimize clickability and visual hierarchy.
- Focus: Emphasize exaggerated expressions, dynamic poses, and stylized backgrounds to convey emotion and movement.
- Details: Include frame-by-frame action notes (e.g., "Character winks at 0:05, then ducks at 0:07") and sound effect cues (e.g., "BOING!").
- Tools: Often hand-drawn or digital sketches with motion lines to indicate speed/direction.
- Example: A 30-second animated ad might use 12–15 panels, with each frame showing incremental changes in character animation.
- Focus: Prioritize camera angles, lighting setups, and actor blocking (positions/movements).
- Details: Specify shot types (e.g., "Extreme close-up of the product") and transition types (e.g., "Match cut on the character’s smile").
- Tools: Photographic references or 3D pre-visualization for complex scenes (e.g., car chases).
- Example: A live-action commercial might use 8–10 panels, with each depicting a distinct camera angle or scene change.
- Focus: Illustrate user interactions, screen transitions, and information hierarchy with wireframe-like precision.
- Details: Include clickable elements, gesture animations (e.g., swipes), and micro-interactions (e.g., button hover effects).
- Tools: Digital tools like Figma or Adobe XD to create interactive prototypes alongside static sketches.
- Example: A UI storyboard for a mobile app might show 5–7 panels, each representing a user flow (e.g., login → dashboard → checkout).
- Level Geometry: A ruined temple with crumbling pillars, uneven terrain, and interactive objects (e.g., loose rocks, pressure plates).
- Lighting: Dynamic shadows cast by torches or a setting sun, creating high-contrast areas for tactical gameplay.
- Character Positions: The player (a rogue) starts in a narrow corridor, while enemies (skeletal warriors) are positioned in an adjacent chamber, partially obscured by debris.
- Frame 1: Wide shot of the corridor, highlighting the player’s starting position and the path forward. Visual cues include a faint glow from the enemy chamber, suggesting danger.
- Frame 2: Close-up of the player’s inventory, emphasizing available tools (e.g., a grappling hook, smoke bombs) to set up the next phase.
- Frame 3: Overhead view of the corridor, marking potential ambush points (e.g., a collapsed archway) where enemies might emerge.
- Frame 4: Split-screen or sequential frames showing the player’s movement—dodging past the archway while triggering a trap (e.g., a net drops from above).
- Frame 5: Enemy reactions are storyboarded with exaggerated animations (e.g., skeletal warriors raising shields) to convey their AI logic (e.g., prioritizing the nearest target).
- Frame 6: Environmental storytelling through visual feedback: shattered pillars after a melee attack, or a torch extinguishing when hit by an arrow.
- Frame 7: A wide-angle shot of the chamber post-combat, showing destroyed obstacles (e.g., a broken statue blocking the exit) and loot (e.g., a glowing artifact on the floor).
- Frame 8: Player’s post-action state (e.g., reloading a weapon, checking health) to reinforce feedback loops and encourage player engagement.
- Scale and Proportion: Storyboards include furniture scaled to human dimensions (e.g., a sofa’s height relative to a coffee table) to test comfort and traffic flow.
- Material Contrast: Visual cues like a sleek marble countertop against a rustic wooden floor highlight design intent (e.g., modern vs. industrial aesthetics).
- Functional Zones: Annotated frames may label areas (e.g., "entertainment nook," "workstation") to clarify intended use.
- Natural vs. Artificial Light: Sketches show how sunlight filters through windows at different times of day, while artificial lighting (e.g., recessed LEDs, pendant lamps) is mapped to create focal points.
- Shadow Play: Storyboards may depict how shadows from furniture or architectural features (e.g., beams) affect ambiance (e.g., creating a cozy reading corner).
- Pathways: Arrows or dotted lines illustrate natural movement routes, ensuring doors, hallways, and open spaces facilitate easy navigation.
- Obstacle Identification: Potential clutter (e.g., a large plant blocking a walkway) is flagged early to avoid post-construction adjustments.
- Frame 1: Wide-angle view of the lobby’s grand staircase, with a storyboard note specifying the marble’s vein pattern to match the hotel’s branding.
- Frame 2: Close-up of the reception desk, showing the placement of a live plant to soften the geometric lines of the counter and a digital display for check-in kiosks.
- Frame 3: Evening scene with ambient lighting (e.g., warm-toned uplights) and a storyboard annotation for "adjustable dimmers" to accommodate different events (e.g., daytime brightness vs. evening elegance).
- Objective: Drive action (e.g., purchases, sign-ups) through aspirational or problem-solving narratives.
- Visual Techniques:
- Hero Shots: High-impact imagery (e.g., a product in use by a relatable character) to create desire.
- Before/After Frames: Contrast visuals (e.g., dull hair vs. shiny hair after using a shampoo) to emphasize benefits.
- Brand Consistency: Color palettes, typography, and logos are storyboarded to ensure uniformity across ads, social media, and packaging.
- Example: A storyboard for a fitness app campaign might show: 1. A sedentary person struggling with daily tasks (Frame 1).
- Objective: Simplify complex information into actionable steps, often using chunking and visual metaphors.
- Visual Techniques:
- Step-by-Step Diagrams: Break down processes (e.g., assembling a bicycle) with numbered frames and annotations.
- Analogies: Use familiar objects to explain abstract concepts (e.g., comparing cell structures to a factory).
- Interactive Cues: Storyboards for e-learning may include placeholders for quizzes or clickable hotspots (e.g., "Drag the label to the correct organ").
- Example: A storyboard for teaching basic first aid might include: 1. A cartoon character choking, with a red "X" over their airway (Frame 1).
- Script Analysis: Break down the script into key scenes, focusing on beats (moments of change in action or dialogue). Identify visual priorities, such as character expressions, environmental details, or symbolic motifs.
- Reference Gathering: Collect visual references—photographs, concept art, or film stills—that capture the desired aesthetic, lighting, or composition. For example, a horror scene may require references for low-light cinematography or specific camera angles (e.g., Dutch angles for unease).
- Technical Constraints: Assess production limitations, such as budget, equipment availability (e.g., crane shots vs. handheld), or location feasibility. Note these in the storyboard to inform creative decisions.
- Style and Tone Board: Develop a mood board combining color palettes, textures, and imagery to unify the visual language. This ensures consistency in color grading and set design.
- Panel Layout: Divide the script into logical shots, typically adhering to the 180-degree rule (maintaining spatial continuity) and rule of thirds for balanced compositions. For dialogue scenes, alternate between close-ups (character reactions) and wide shots (environmental context).
- Camera Angles and Movement: Use standard angles (e.g., eye-level, low-angle for power dynamics) and indicate movement with arrows or directional lines. Example:
- Wide shot → Establishing the scene.
- Medium shot → Character interaction.
- Close-up → Emotional beats (e.g., tears, clenched fists).
- Action and Dialogue Integration: Align sketches with script lines, ensuring dialogue is visually supported. For instance, a character’s line “The door creaked open” might be paired with a panel showing a slow-motion shot of a hand turning a doorknob, with sound cues noted (e.g., “SFX: Creak”).
- Proportions and Perspective: Use grid systems or perspective guides to ensure accurate representations of depth (e.g., one-point or two-point perspective for interiors).
- Character and Prop Placement: Sketch stick figures or simplified shapes to test blocking (character movement within the frame). For props, note scale and placement (e.g., “Table centered, lamp to the left”).
- Lighting and Shadows: Indicate light sources (e.g., “Key light from window”) and shadow directions to guide lighting technicians. Use hatching or shading to suggest mood (e.g., heavy shadows for tension).
- Panel Number and Scene Reference: Example: “Scene 12, Shot 03”.
- Camera Notations: Focal length (e.g., “35mm lens”), movement (e.g., “Truck left”), and angle (e.g., “Low angle, 45°”).
- Sound and Effects Cues: Mark dialogue (“DIAL: ‘Help me!’”), sound effects (“SFX: Footsteps crunching”), and music cues (“MUS: Tense sting”).
- Department-Specific Notes: Add columns for art, camera, or sound departments to avoid clutter. Example:
- Art: “Background: Abandoned subway, graffiti”.
- Camera: “Slow zoom on character’s face”.
- Sound: “Ambient: Dripping water”.
- Panel Sketch: A medium shot of the character kneeling, hand brushing dust off a door frame.
- Annotations:
- Blue outline: Camera positioned at eye level, 50mm lens.
- Green text: “DIAL: ‘It’s been here the whole time.’”.
- Yellow circle: Light source from a flickering bulb above the door.
- Purple note: “VFX: Door texture enhancement”.
- Red arrow: Points to the character’s face for close-up emphasis.
- Action Lines: These often dictate shot composition. Example:
- “She slams the door shut.” → Close-up of the door handle, followed by a wide shot of the character’s frustrated stance.
- “The room spins.” → Subjective camera shot (shaky, disorienting angles).
- Dialogue: Use dialogue to guide pacing and framing. For overlapping conversations, alternate between characters’ perspectives (e.g., “A: ‘You lied.’ / B: ‘No, I—’” → Cut to B’s wide-eyed reaction).
- Parentheticals and Stage Directions: These are goldmines for visual cues. Example:
- “(whispers, terrified)”: Low-angle shot, dim lighting, character half-hidden in shadow.
- “(slams fist on table)”: Dutch angle to emphasize aggression.
- Shot Transition Logic: Ensure transitions between panels adhere to continuity (e.g., match cuts, eyelines) and cause-and-effect (e.g., a character’s action in one panel leads to a reaction in the next).
- Pacing: Use panel size to control tempo. Smaller panels (e.g., quick cuts) increase urgency, while larger panels (e.g., establishing shots) slow the rhythm.
- Silent Communication: Some moments require visual storytelling without dialogue. Example:
- A character’s gaze lingering on a photograph → Panel sequence showing the photo’s details (e.g., a child’s face) without sound.
- Limited real-time collaboration (e.g., Storyboard That’s basic sharing via links).
- Cloud-based sharing with version control in some free tiers (e.g., Canva’s team folders).
- No advanced permissions (e.g., role-based access for producers, directors).
- Full real-time collaboration with annotations, comments, and version history (e.g., Adobe Story’s cloud sync).
- Integration with project management tools (e.g., Trello, Asana via Zapier).
- Client review portals with approval workflows (e.g., FrameForge’s client portals).
- Basic templates (e.g., grid layouts, character placeholders in Storyboard That).
- Limited customization (e.g., Canva’s pre-made storyboard frames).
- No industry-specific templates (e.g., animation shot breakdowns, game UI storyboards).
- Extensive template libraries with industry standards (e.g., Toon Boom’s animation-specific templates).
- Customizable templates with adjustable panel counts, aspect ratios, and camera angles.
- Integration with asset libraries (e.g., Adobe Stock for paid users).
- Basic exports (PNG, JPEG, PDF) with watermarks in some free tiers.
- No direct export to animation software (e.g., Blender, After Effects).
- Limited resolution for high-end production use.
- High-resolution exports (PNG, TIFF, PSD) with alpha channels for compositing.
- Direct integration with animation pipelines (e.g., FrameForge’s export to Unity/Unreal).
- Customizable export presets for different industries (e.g., film vs. gaming).
- Basic AI-generated assets (e.g., Canva’s Magic Design for simple illustrations).
- No scene analysis or automated layout suggestions.
- AI-powered scene composition (e.g., Toon Boom’s "Smart Camera" for automated framing).
- Generative art for concept sketches (e.g., Adobe Firefly integration in Adobe Story).
- Automated storyboard sequencing based on script analysis.
- User-friendly interfaces ideal for beginners and educators.
- Limited advanced features for complex workflows.
- Steep learning curve for professional features (e.g., Toon Boom’s rigging tools).
- Comprehensive tutorials and community support (e.g., Adobe’s official guides).
- Recommended Tablets:
- Budget: Huion Kamvas 13 (1,900 lines pressure sensitivity, USB-C).
- Mid-Range: Wacom Intuos Pro (medium, 8,192 levels, Bluetooth).
- Professional: Wacom Cintiq Pro 24 (4K display, pen tilt support).
- Essential Accessories:
- Stylus pen with ergonomic grip (e.g., Wacom Pro Pen 2).
- Adjustable desk stand for screen height alignment.
- Shortcut keys or foot pedals (e.g., Wacom ExpressKey Remote).
- Drawing Software: Clip Studio Paint EX (industry-standard for storyboards), Procreate (for iPad), or Krita (free alternative).
- Brush Profiles:
- Inking: Use a "G-Pen" or "Micron" brush (0.3–0.5 mm hardness) for clean lines.
- Textures: Layer "chalk" or "ink" brushes for sketchy thumbnails.
- Color Pencils: Simulate traditional media with brushes like "Real G-Pen" (Clip Studio) or "Procreate’s Inkling."
- Layer Organization:
- Flat Layers: Background, midground, foreground, characters, effects.
- Group Layers: Label by scene (e.g., "Scene_01_Ext_Day") for easy navigation.
- Adjustment Layers: Add non-destructive color corrections or lighting effects.
- Clip Studio Paint:
+ + to copy/paste layers. to toggle brush size, for opacity. + on layer thumbnail to select all pixels. - Krita:
to pan, + to zoom. + to rotate canvas. - Customizable macro recorder for repetitive tasks (e.g., applying a drop shadow).
- Wacom ExpressKey:
- Assign
to toggle brush opacity. - Program
to cycle through brush presets. - Generative Art:
- MidJourney/Stable Diffusion: Create preliminary character designs or background sketches.
- Adobe Firefly: Generate color scripts or mood boards from text prompts.
- Script Analysis:
- Plottr.ai: Automatically break down scripts into shot lists with suggested camera angles.
- Close-ups emphasize facial expressions or objects, ideal for emotional beats or critical details (e.g., a character’s clenched fist in a tense moment).
- Wide shots establish context, such as a battlefield or a sprawling cityscape, grounding the audience in the environment.
- Over-the-shoulder shots create intimacy, often used in dialogues to imply proximity between characters.
- Motion lines (diagonal or curved strokes) to suggest speed or direction, such as a car’s movement or a character sprinting.
- Speed indicators (e.g., blurred edges for fast motion, sharp lines for abrupt stops) to reinforce action intensity.
- Sequential framing (e.g., a series of panels showing a camera push-in) to simulate dynamic camera work without explicit annotation.
- Slow pacing (e.g., lingering on a character’s sorrowful gaze) heightens emotional impact.
- Rapid pacing (e.g., quick cuts during a chase) sustains urgency.
- Silent pauses (empty panels or minimalist framing) can underscore dramatic silence, as seen in thriller sequences.
- Diagonal lines imply swift, dynamic action (e.g., a sword slash or a falling object).
- Curved lines suggest rotational motion (e.g., a spinning top or a character’s hair in wind).
- Blurred edges indicate high speed, while sharp, jagged lines convey abrupt stops or impacts.
- A three-panel sequence might show: 1. A character winding a spring (setup).
- Overlapping action (e.g., a fist connecting mid-swing) adds realism to motion.
- Partial visibility (e.g., a character stepping into frame mid-action).
- Environmental changes (e.g., a clock ticking, shadows shifting).
- Panel transitions (e.g., a dissolve or wipe to signal a time jump).
- Silhouette tests: Verify that characters retain recognizable shapes across panels (e.g., a hero’s cape should always drape similarly under gravity).
- Proportional accuracy: Height, limb lengths, and facial features must remain proportional to avoid distortion.
- Pose continuity: Dynamic poses (e.g., running, jumping) should align with anatomical principles to prevent unnatural movements.
- Scale references: Use consistent objects (e.g., a coffee cup, a doorknob) to maintain spatial proportions.
- Lighting direction: Shadows should cast uniformly (e.g., all characters’ shadows pointing left if the light source is fixed).
- Environmental details: Background elements (e.g., street signs, furniture) must remain unchanged unless intentionally altered for narrative effect.
- Limited palettes: Restrict color schemes to avoid visual clutter (e.g., muted tones for realism, vibrant hues for fantasy).
- Material consistency: Surfaces (e.g., wood grain, metal sheen) should appear uniform unless textured intentionally for contrast.
Structure and Components of Storyboards
Storyboards serve as the blueprint for visual storytelling, translating scripts or ideas into sequential visual narratives. Their effectiveness depends on a standardized structure that ensures clarity, coherence, and adaptability across mediums—whether animation, live-action, or UI design. Below, the foundational elements of a storyboard panel are examined, followed by practical applications in pacing, transitions, and layout principles. Additionally, distinctions between storyboard types are outlined to highlight medium-specific considerations.Standard Elements of a Storyboard Panel
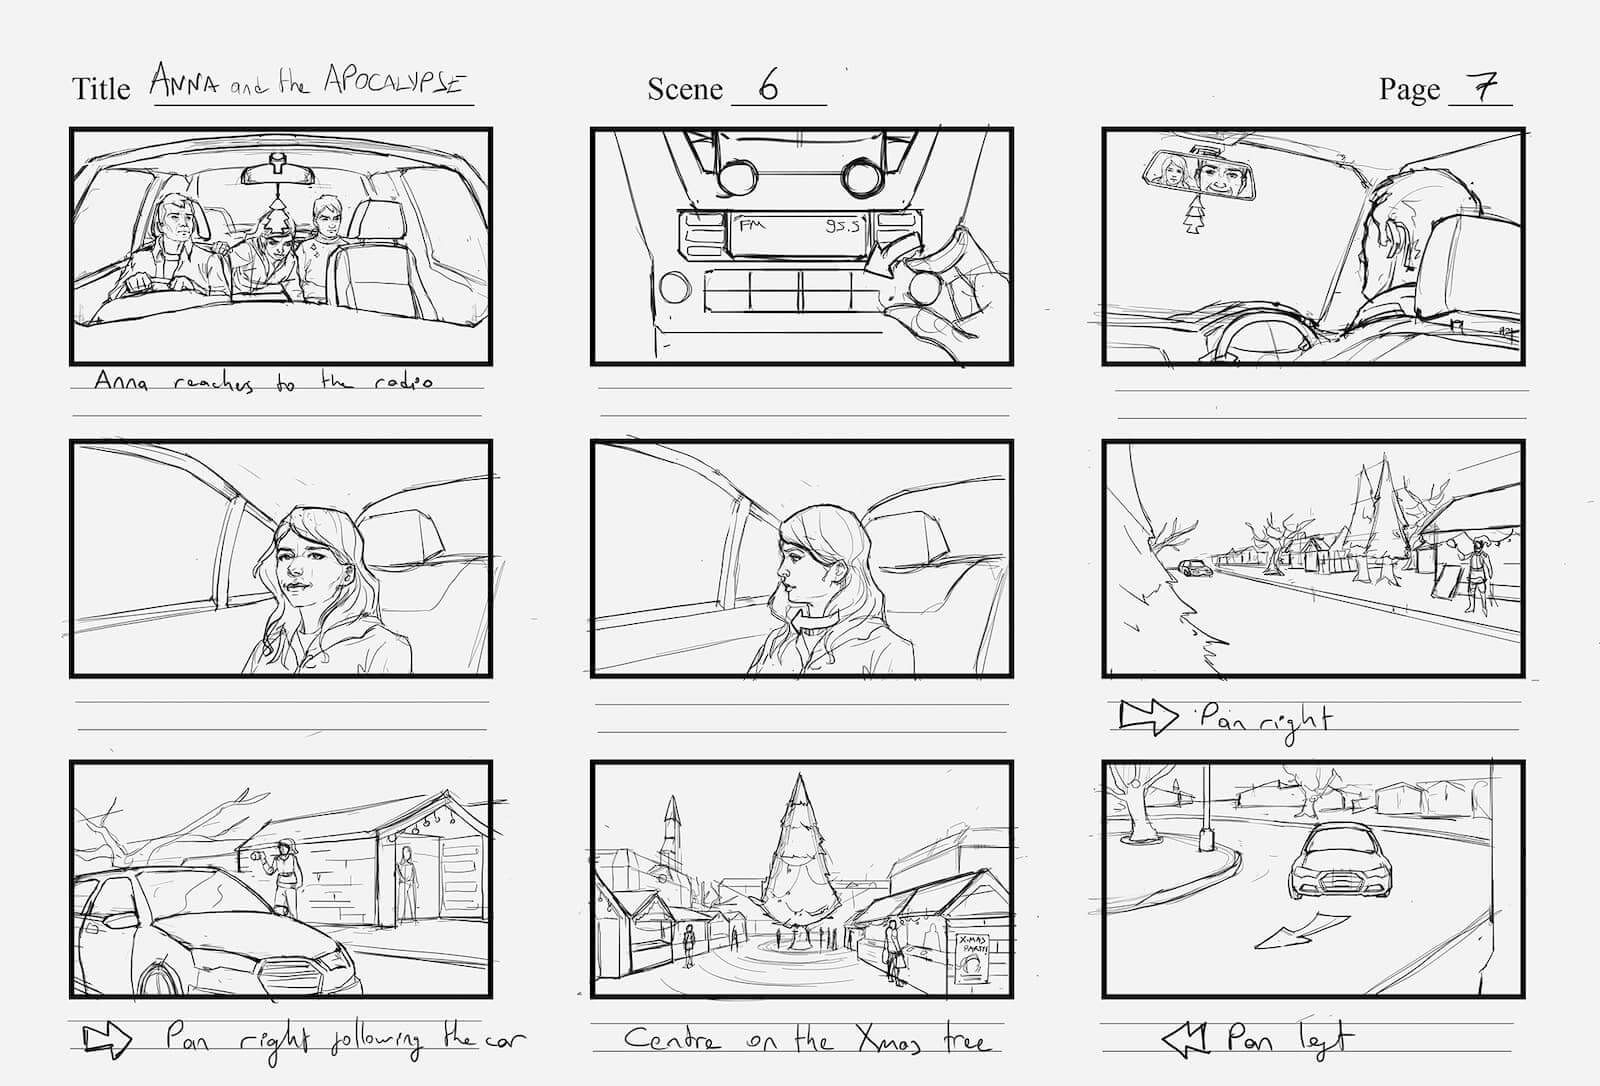
Each storyboard panel consists of discrete components that collectively convey action, dialogue, and visual direction. These elements include:- Frames (Thumbnails): The primary visual representation of a scene, drawn or sketched in a simplified, schematic style. Frames prioritize composition over detail, ensuring the core elements—characters, objects, and environments—are immediately recognizable. For example, a frame for a commercial might depict a product in use with exaggerated expressions or dynamic angles to emphasize its features.
- Action Descriptions: Text placed beneath or beside the frame that details movements, camera angles, or transitions. These descriptions act as instructions for animators, directors, or designers, specifying actions like "Camera zooms in on the product’s texture" or "Character’s hand reaches for the bottle with a satisfied grin." Clarity in these descriptions prevents ambiguity during production.
- Dialogue: Quoted speech or sound effects (e.g., "CRUNCH!") included when applicable, particularly in commercials or animated sequences. Dialogue is typically centered or aligned with the frame to mirror how it would appear in the final medium. For live-action, this may be minimal, while animation or UI may require precise timing cues.
- Annotations: Additional notes for technical or creative guidance, such as "Use warm lighting for coziness" or "Add a subtle glow effect." Annotations address aspects like color grading, sound design, or visual effects that may not be evident in the frame alone. They are often boxed or italicized to distinguish them from action descriptions.
- Panel Numbering and Flow Arrows: Sequential numbering (e.g., "1," "2") ensures scenes are ordered correctly, while arrows or connecting lines indicate transitions between panels. This is critical for maintaining narrative continuity, especially in fast-paced sequences like a 30-second commercial.
Organizing a Storyboard Sequence for a 30-Second Commercial
A 30-second commercial typically requires 6–12 panels, balancing visual variety with pacing to retain viewer attention. The sequence should adhere to the following principles:- Panel Count and Pacing:
- Transitions Between Scenes:
- Example Layout:
| Panel | Timecode | Description | Notes |
|---|---|---|---|
| 1 | 0:00 | Close-up of a messy kitchen counter | "Low-angle shot, chaotic lighting" |
| 2 | 0:03 | Hand struggling with a slow blender | "Sound effect: 'GRIND... GRIND...'" |
| 3 | 0:06 | Product (blender) appearing magically | "Zoom-in reveal, upbeat music" |
| 4 | 0:09 | Blender in action, fast liquid pour | "Time-lapse effect for speed" |
| 5 | 0:12 | Smiling family enjoying smoothies | "Warm color filter applied" |
| 6 | 0:15 | Text: "Now brewing in 10 seconds!" | "Bold typography, red highlight" |
| 7 | 0:20 | Callout to website: "ShopNow.com" | "Logo animation suggested" |
Rule of Thirds in Storyboard Layout
The rule of thirds divides a frame into a 3×3 grid, positioning key elements along the intersecting lines or at their junctions to create dynamic, visually engaging compositions. This principle enhances balance, draws the viewer’s eye to focal points, and avoids static or overly symmetrical layouts.Impact on Composition:
Application in Storyboard Sequences:
Critical Differences Between Storyboard Types
Storyboards vary significantly by medium, reflecting the technical and creative constraints of animation, live-action, and UI design. Below are the key distinctions:- Animation Storyboards:
- Live-Action Storyboards:
- UI/UX Storyboards:
Applications Across Industries
Storyboards serve as a versatile tool across diverse industries, enabling teams to pre-visualize workflows, interactions, and spatial arrangements before execution. Their adaptability stems from the ability to translate complex ideas into sequential, digestible visual narratives, ensuring alignment among stakeholders and reducing ambiguity in execution. Below, key applications are explored in game development, architecture, marketing, and medical training, with an emphasis on their functional and creative roles.Role of Storyboards in Game Development: Level Design and Character Interactions
In game development, storyboards act as a blueprint for both environmental design and player-character interactions, bridging the gap between conceptual art and technical implementation. They ensure that level layouts, pacing, and narrative cues align with gameplay mechanics, player expectations, and artistic direction. The process involves breaking down scenes into frames that define camera angles, object placements, and player actions, while also accounting for dynamic elements like physics and AI behavior.Step-by-Step Breakdown of a Sample Game Scene: Combat Encounter in a Fantasy Setting
1. Scene Context Establishment
The storyboard begins by defining the environment and objectives. For a fantasy combat scene, key visual cues include:
2. Player Introduction and Initial Actions
3. Dynamic Interactions and Combat Flow
4. Climax and Resolution
Key Tools and Software
Developers use digital storyboard tools like Adobe Photoshop, Miro, or Twine to create interactive prototypes. For 3D games, Unity’s Timeline or Unreal Engine’s Sequencer integrate storyboard-like functionality directly into the engine, allowing real-time adjustments to camera paths and animations.
Storyboards in game development ensure that every frame serves a dual purpose: it must adhere to gameplay mechanics while reinforcing the game’s narrative and aesthetic cohesion.
Storyboards in Architecture and Interior Design: Visualizing Spatial Layouts
Architects and interior designers rely on storyboards to communicate spatial relationships, material choices, and functional workflows before physical construction begins. Unlike traditional blueprints, which focus on technical specifications, storyboards emphasize user experience, ergonomics, and visual harmony. They often incorporate mood boards, 3D renderings, and annotated sketches to convey how spaces will feel and function in real time.Key Visual Cues in Architectural Storyboards
1. Furniture and Fixture Placement
2. Lighting Design
3. Circulation and Flow
Example: Storyboarding a Luxury Hotel Lobby
Software and Techniques
Professionals use SketchUp, AutoCAD, or Revit for 3D modeling, while Canva or Procreate handle stylized storyboards. Augmented reality (AR) tools like Enscape allow clients to "walk through" storyboarded spaces virtually before construction.
Architectural storyboards transform static plans into experiential narratives, ensuring that every element—from a door handle to a ceiling fixture—serves both form and function.
Comparative Analysis: Storyboards in Marketing Campaigns vs. Educational Content
While both marketing and educational storyboards leverage visual storytelling, their core objectives and execution differ significantly. Marketing storyboards prioritize emotional engagement, brand alignment, and conversion, whereas educational storyboards focus on clarity, retention, and skill acquisition. The visual language in each context adapts to its audience’s cognitive and psychological needs.Marketing Campaign Storyboards
2. The same person using the app, with animated progress bars (Frame 2).
3. A celebratory shot of them completing a challenge, with the app’s logo superimposed (Frame 3).
Educational Storyboards
2. A step-by-step illustration of the Heimlich maneuver, with arrows showing hand placement (Frame 2).
3. A "practice" frame where the learner is prompted to describe the next step aloud.
Key Differences in Visual Storytelling
| Aspect | Marketing Storyboards | Educational Storyboards |
|---|---|---|
| Audience Focus | Emotional triggers (fear, joy |
Creation Process and Techniques for Storyboarding
Storyboarding transforms a script into a visual roadmap, bridging the gap between conceptualization and execution. This process involves translating narrative elements—dialogue, action, and pacing—into sequential panels that guide production teams in achieving a cohesive final product. The creation of a storyboard requires a structured approach, integrating research, sketching, and iterative refinement to ensure clarity, functionality, and alignment with creative and technical constraints.The effectiveness of a storyboard hinges on its ability to communicate intent across departments, from cinematography to sound design. Techniques such as color coding, panel composition, and script adaptation are critical in maintaining narrative flow while accommodating logistical and artistic requirements. Below, the step-by-step process is outlined, alongside methodologies for departmental coordination and script visualization.
Step-by-Step Guide to Creating a Storyboard for a Short Narrative Film
The storyboard creation process is iterative, beginning with pre-production research and culminating in a polished visual sequence. Each phase refines the narrative into actionable frames, ensuring alignment with the script’s tone, pacing, and technical feasibility.Pre-Production Research and Preparation
Before sketching, thorough research establishes the foundation for accurate and immersive storytelling. Key steps include:
Thumbnail Sketching
Thumbnails are rough, rapid sketches that explore composition, framing, and narrative flow without concern for detail. Their purpose is to test visual ideas efficiently.
Refining Panels
Once thumbnails are approved, refine them into clearer, more detailed sketches while maintaining readability. Key refinements include:
Finalizing Panels
The final storyboard combines polished sketches with annotations for production teams. Each panel should include:
Color Coding in Storyboards for Departmental Coordination
Color coding standardizes communication between departments by visually categorizing elements within each panel. This system reduces ambiguity and accelerates pre-visualization. Below is a sample breakdown of color conventions, adaptable based on project needs:| Department | Color | Example Usage |
|---|---|---|
| Camera Angles | Blue | Outline the frame in blue to denote camera placement (e.g., “Blue box: Wide shot”). |
| Sound Cues | Green | Highlight dialogue or sound effects in green text (e.g., “GREEN: ‘Run!’”). |
| Visual Effects | Purple | Mark areas requiring VFX (e.g., “PURPLE: Explosion composite”). |
| Lighting | Yellow | Circle light sources or note angles (e.g., “YELLOW: Key light from right”). |
| Props/Set Dressing | Orange | Circle props or annotate placement (e.g., “ORANGE: Broken chair, foreground”). |
| Character Focus | Red | Bold outlines or arrows to indicate primary subject (e.g., “RED: Protagonist”). |
Consider a scene where a character discovers a hidden door:
This system ensures that during production, each department can quickly identify their responsibilities without cross-referencing separate documents.
Translating Script to Storyboard Without Losing Narrative Flow
Adapting a script into a storyboard requires balancing visual storytelling with textual integrity. The process involves dissecting the script into visual beats—moments that justify a camera change—and ensuring each panel serves the narrative’s emotional or thematic arc.Script Analysis for Visual Beats
Maintaining Narrative Flow
Example: Dialogue-to-Visual Adaptation
Script Excerpt:
CHARACTER A (pointing at a map):
“We have to go left. The river’s too dangerous on the right.”
CHARACTER B (hesitant):
“But the bridge is out.”
Storyboard Panels:
1. Wide Shot: Both characters standing over a map, A’s finger tracing a path. *Camera angle: S
Tools and Software for Storyboard Creation
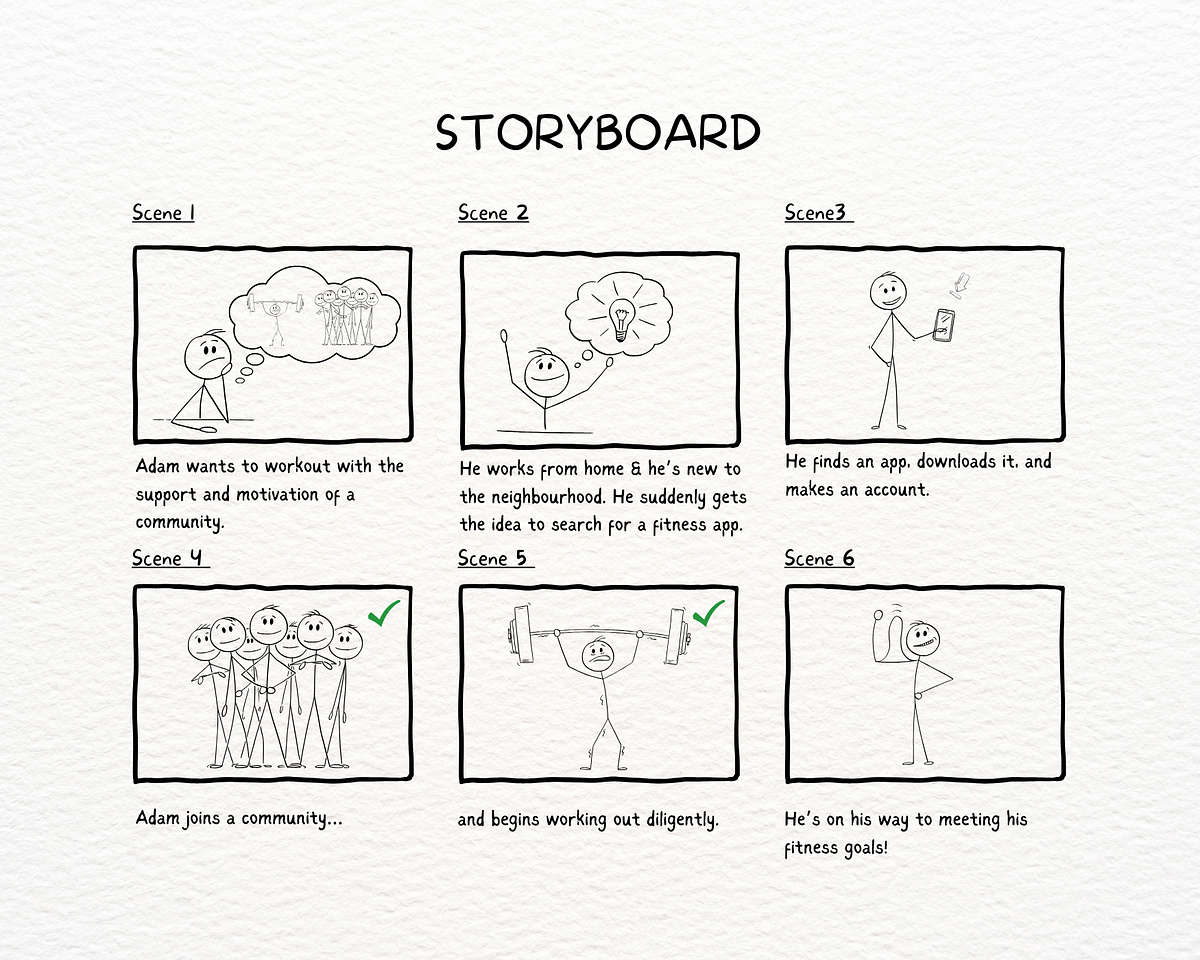
Storyboard creation relies heavily on the right tools, whether digital or traditional, to streamline workflows, enhance collaboration, and optimize creativity. Modern software solutions range from free, beginner-friendly applications to professional-grade platforms with advanced features like AI integration, real-time collaboration, and industry-standard export formats. Selecting the appropriate tool depends on project requirements, budget constraints, and the artist’s proficiency level. Below is a structured breakdown of software options, hardware integration, and emerging AI-assisted workflows, along with a curated checklist for beginners.Comparison of Free vs. Paid Storyboard Software
The choice between free and paid software hinges on features such as collaboration tools, template availability, and export flexibility. Below is a comparative table outlining key differences, with a focus on usability for storyboard artists across disciplines.| Feature | Free Software (Examples: Storyboard That, Canva, OpenToonz) | Paid Software (Examples: Adobe Story, Toon Boom Harmony, FrameForge) |
|---|---|---|
| Collaboration Tools | ||
| Template Libraries | ||
| Export Options | ||
| AI-Assisted Features | ||
| Learning Curve |
For freelancers or small studios, free tools suffice for preliminary sketches and client presentations, while paid software becomes essential for pre-production pipelines in film, animation, or gaming. Hybrid approaches—such as using free software for initial drafts and paid tools for final exports—can balance cost and functionality.
Digital Tablet Workflow for Storyboard Artists
Digital tablets (e.g., Wacom Cintiq, Huion Kamvas) are industry standards for storyboard artists due to their pressure sensitivity, color accuracy, and integration with drawing software. Below are optimized settings and workflows to maximize efficiency while maintaining a natural drawing experience.Hardware Setup:
Software and Brush Settings:
Efficiency Shortcuts:
Workflow Tip:
Enable "Stabilization" in brush settings (3–5 levels) to reduce shaky lines, especially for dynamic scenes. For perspective grids, use Clip Studio’s "3D Model" tool to project orthographic views or Krita’s "Perspective Guide" for manual sketches.
AI-Assisted Storyboard Creation
AI tools are transforming storyboard creation by automating repetitive tasks, generating concept art, and analyzing script structure. Below are practical applications, example prompts, and outputs for common scenarios.AI Tools for Storyboarding:
Visual Storytelling and Best Practices in Storyboarding
Storyboarding transcends mere visual planning; it serves as a dynamic framework for visual storytelling, where every panel must communicate narrative intent through composition, motion, and emotional resonance. Effective visual storytelling in storyboards relies on deliberate choices in framing, camera movement, and pacing to guide the audience’s interpretation. This section explores the principles of visual storytelling, techniques for conveying motion in static panels, and methods for maintaining visual consistency—key elements that distinguish a compelling storyboard from a static sequence of ideas.Principles of Visual Storytelling in Storyboards
Visual storytelling in storyboards adheres to core cinematographic and artistic principles that translate scripted dialogue and action into a visually engaging sequence. These principles include shot composition, camera movement, and emotional pacing, each contributing to the storyboard’s ability to evoke intended reactions.Shot Composition
Composition determines how elements within a frame are arranged to direct attention and convey meaning. Storyboard panels should apply the rule of thirds, leading lines, and framing techniques to create balance and focus. For example:
Camera Movement
Even in static storyboards, implied camera movement (e.g., panning, tilting, or tracking) can convey motion and depth. Techniques include:
Emotional Pacing
Pacing dictates the rhythm of the storyboard, balancing moments of tension, release, and reflection. For instance:
"A storyboard’s power lies in its ability to pre-visualize emotion through composition and movement—what the camera ‘sees’ must align with what the audience ‘feels.'" — Sidney Lumet, Filmmaker
Conveying Motion and Timing in Static Panels
Static storyboard panels must visually communicate motion, speed, and temporal progression through descriptive techniques. These methods bridge the gap between a frozen image and the fluidity of live action.Motion Lines and Speed Indicators
Motion lines (e.g., speed streaks, directional arrows) guide the viewer’s eye along the path of movement. For example:
Sequential Framing for Action
Breaking complex actions into sequential panels clarifies timing and causality. For instance:
2. The spring releasing (action initiation).
3. The resulting projectile flying (conclusion).
Temporal Indicators
Panels can imply time passage through:
"The best storyboards use motion lines like a painter’s brushstrokes—subtle enough to guide, bold enough to command attention." — Andrew Stanton, Storyboard Artist (Finding Nemo)
Maintaining Visual Consistency in Storyboards
Inconsistencies in character design, props, or environments disrupt immersion and undermine the storyboard’s credibility. Consistency ensures the narrative world feels cohesive and believable.Character Design Uniformity
Prop and Environment Consistency
Color and Texture Harmony
"A storyboard is a lie that tells the truth—every inconsistency is a distraction from the story you’re trying to sell." — Bruce Block, Storyboard Artist (The Dark Knight)
Template for a Storyboard Critique Sheet
A structured critique sheet ensures feedback is constructive, focusing on pacing, clarity, and creative execution. Below is a template formatted for review sessions:| Storyboard Critique Sheet | |
|---|---|
| Category | Feedback |
| Pacing & Rhythm | |
| Panel Flow | Does the sequence of panels maintain logical progression? Are transitions smooth or jarring? |
| Temporal Clarity | Are motion and timing effectively conveyed? Are there ambiguous or rushed sequences? |
| Emotional Beats | Do pauses or speed variations enhance emotional impact? Are key moments given sufficient weight? |
| Visual Composition | |
| Framing & Shot Selection | Are camera angles and compositions purposeful? Do they serve the story or distract? |
| Motion Representation | Are motion lines, speed indicators, and sequential framing clear and effective? |
| Visual Consistency | Are character designs, props, and environments uniform? Are there discrepancies in scale or style? |
| Creative Execution | |
| Originality | Does the storyboard offer fresh visual solutions, or rely on clichés? |
| Narrative Clarity | Is the story’s intent unambiguous? Do panels reinforce dialogue, action, or subtext? |
| Technical Polish | Are lines clean, annotations legible, and panel layouts professional? |
| General Comments | |
Leave a Comment
Comments are moderated before appearing. The data you submit is processed according to the Privacy Policy of Voltefac.